

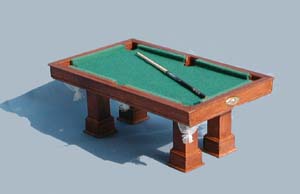
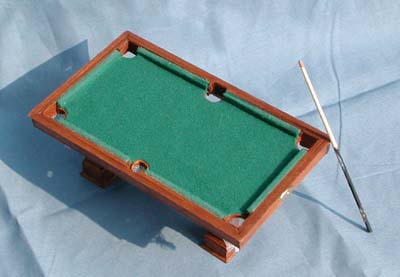
1 inch scale pool table tutorial

We're almost there! Still with me? No more mitring!
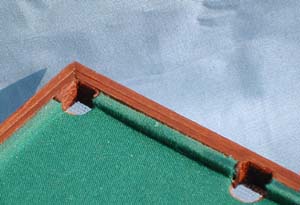
Now it's time to install the pockets. I used a fine white tulle. It has smaller holes than your typical netting and is softer. I don't know if it comes in other colors, but I think I'd prefer brown if I were to do this again.
Cut a length of tulle about an inch and a half wide and an inch long. Wrap the longer end around your finger and tie one end tightly closed with a piece of thread. It forms a bag, if it overlaps a bit, that's ok. Glue the open end of the bag to the bottom edges of the pockets.
(Yes, I know, I was experimenting with length, so they're different sizes!)
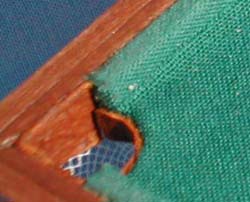
To clean up the inside of the pocket, I used thin, thin leather scraps. (It was part of my stash, but it's labeled The Leather Factory, Leather Trim Piece, 100% pigskin leather, if you want to know EXACTLY what I used!) I cut a thin strip to cover the wooden edge of the pocket (and where I glued the net bags), painted wood stain on the smooth edge of the leather to blend it in to the wood, and glued it in place.
Did you notice that we haven't covered the table yet? I did this for two reasons. One, if you're anything like me, that cover will get ruined before you're finished with the rest of it. Two, well, when I did it, I tried to use an iron-on fusible bonding, but couldn't get it to stick. The fabric I have is a great pool table cloth, but it isn't 100% natural fabric! The glue showed right through, so I couldn't glue it directly to the table. Instead, I made a paper template of the table itself and traced it on to fusible webbing paper. (freezer paper may work just as well!) When cutting it out, don't cut out the holes completely. Trim them down, as we'll be folding the edges over into the hole. Test your glue carefully, you don't want anything to show through!
After ironing on the paper. place your fabric on the table and glue sparingly. Alternately, don't glue at all, just glue down the edges of the pockets. Cover those edges with even thinner strips of leather.
Are we done? Almost! Make sure all your pieces have been sealed and/or varnished. (Is that the same thing?) Glue the table to the base, making sure the corners don't overlap into the holes and it's centered.
Accessories
Remember that 1/8"x1/8" strip of wood I included in the materials? Cut four pieces into 4 3/4" sections. This will take some time, but sand it down to a round shape, one end narrower than the other. Paint one edge, and you have your pool cue!
Cue balls can be made out of 3/16" (or 5/6mm) round beads. Paint them to look like cue balls. I didn't relish the thought of doing that, so I bought mine from Stockton Miniatures. I felt, after all that work, it was well worth the price!
Congratulations! You have made your first pool table! I hope you enjoyed this tutorial. I will be looking into designing another table, the kind where the balls drop into the table, and not a bag. Look for that in the future!
Questions, comments, completely lost? Send me an
Back to Minis Page
Do-It-Yourself Miniature Pool Table Tutorial
Copyright Elaine C. Brown, 2002